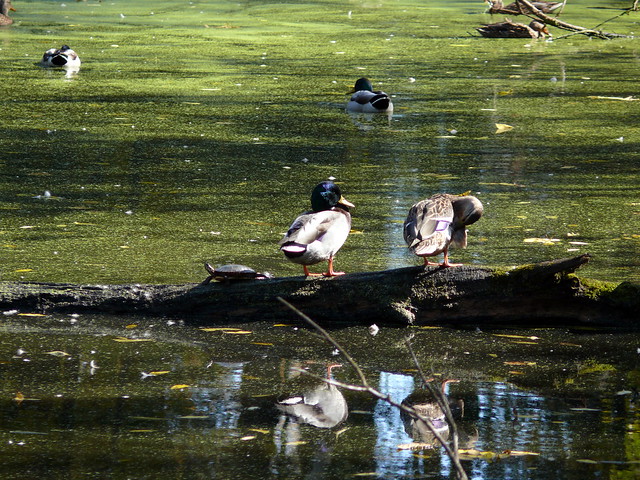
October 9 was a great day for a walk around Blandford Nature Center. Warm air, lots of sunshine, light breeze, and all the animals were out soaking up some mid-autumn sunlight. Click the photo to see the rest of the set on Flickr.

Immanentize the Empathy
October 9 was a great day for a walk around Blandford Nature Center. Warm air, lots of sunshine, light breeze, and all the animals were out soaking up some mid-autumn sunlight. Click the photo to see the rest of the set on Flickr.
If you are using a “modern” browser, you should see a box full of circles.
abcde fghij klmno pqrst uvwxy z
If not, you need to upgrade your browser.
The circles were created using the new CSS3 border-radius property. The markup I used looks something like this:
<div id="post-20111013-a">
<span>a</span><span>b</span><span>c</span><span>d</span><span>e</span>
<span>f</span><span>g</span><span>h</span><span>i</span><span>j</span>
<span>k</span><span>l</span><span>m</span><span>n</span><span>o</span>
<span>p</span><span>q</span><span>r</span><span>s</span><span>t</span>
<span>u</span><span>v</span><span>w</span><span>x</span><span>y</span>
<span class="s2">z</span>
</div>
#post-20111013-a {width:640px;height:480px;outline:1px solid #999;background:#ffffff;}
#post-20111013-a span {
	float:left;
	width:50px;
	height:50px;
	margin:14px;
	border:1px solid red;
	background:#999999;
	-webkit-border-radius: 27px;
	-moz-border-radius: 27px;
	border-radius: 27px;
	text-align:center;
	line-height:50px;
}
#post-20111013-a span.s2 {
	float:none;
	clear:both;
	display:block;
	margin:20px auto;
	width:100px;
	height:100px;
	line-height:100px;
	-webkit-border-radius: 54px;
	-moz-border-radius: 54px;
	border-radius: 54px;
}
#post-20111013-a span:hover {
	-webkit-box-shadow: 5px 5px 5px 0px rgba(0, 0, 0, .5);
	-moz-box-shadow: 5px 5px 5px 0px rgba(0, 0, 0, .5);
	box-shadow: 5px 5px 5px 0px rgba(0, 0, 0, .5);
}
#post-20111013-a span.s2:hover {
-webkit-box-shadow: 0px 0px 20px 20px rgba(255, 0, 0, .5);
	-moz-box-shadow: 0px 0px 20px 20px rgba(255, 0, 0, .5);
	box-shadow: 0px 0px 20px 20px rgba(255, 0, 0, .5);
}
The first block is the HTML which makes up the above demo, and the second is the style sheet. Pretty self-explanatory. I set the border radius to slightly more than half of the diameter of the circle (width/height of the element). Putting the border radius at exactly half of the diameter renders as a very slightly squarish circle. You can play around with border-radius on this page at the w3schools. You can read more about the browser compatibility and best practices at The Art of the Web.
Unfortunately the hit area for each element is still a rectangle large enough to contain the circle, so in that sense it is not much of an improvement over using a background image. Still, it is a huge step in the right direction.
A few years ago I attempted to create a game for the GameDev.net Four Elements Contest. I had an idea that I wanted the game to be a cross between Nethack and Elite – and maybe a little Spore – which is to say, loads and loads of procedurally generated content. I never got past a very rough prototype of the world-building engine, but I learned a lot about procedural generation, and game development in general. Specifically, that it takes a lot more time than I generally have available.
One of the artifacts of this experiment was an extremely useful Mersenne Twister class, which I ported over from a C class I found on Wikipedia. A Mersenne Twister is a seeded pseudo-random number generator. In other words, for a given input n and a range r, it will return a random number between 0 (or whichever number you designate as the lower bound) and r, using n as the seed.
How is that useful? If you want to be able to, for instance, save a game which is based on random number-seeded procedural content, you want to be able to return the same seed every time. And if someone wants to start a new game, you want that seed to be different, but also repeatable. If you can’t reload a saved game and have it be based off the same random number as before, then loading a game would be no different from starting a new one.
Anyway. Here is the Actionscript 3 class:
/*
   A C-program for MT19937, with initialization improved 2002/1/26.
   Coded by Takuji Nishimura and Makoto Matsumoto.

   Before using, initialize the state by using init_genrand(seed)
   or init_by_array(init_key, key_length).

   Copyright (C) 1997 - 2002, Makoto Matsumoto and Takuji Nishimura,
   All rights reserved.

   Redistribution and use in source and binary forms, with or without
   modification, are permitted provided that the following conditions
   are met:

     1. Redistributions of source code must retain the above copyright
        notice, this list of conditions and the following disclaimer.

     2. Redistributions in binary form must reproduce the above copyright
        notice, this list of conditions and the following disclaimer in the
        documentation and/or other materials provided with the distribution.

     3. The names of its contributors may not be used to endorse or promote
        products derived from this software without specific prior written
        permission.

   THIS SOFTWARE IS PROVIDED BY THE COPYRIGHT HOLDERS AND CONTRIBUTORS
   "AS IS" AND ANY EXPRESS OR IMPLIED WARRANTIES, INCLUDING, BUT NOT
   LIMITED TO, THE IMPLIED WARRANTIES OF MERCHANTABILITY AND FITNESS FOR
   A PARTICULAR PURPOSE ARE DISCLAIMED.  IN NO EVENT SHALL THE COPYRIGHT OWNER OR
   CONTRIBUTORS BE LIABLE FOR ANY DIRECT, INDIRECT, INCIDENTAL, SPECIAL,
   EXEMPLARY, OR CONSEQUENTIAL DAMAGES (INCLUDING, BUT NOT LIMITED TO,
   PROCUREMENT OF SUBSTITUTE GOODS OR SERVICES; LOSS OF USE, DATA, OR
   PROFITS; OR BUSINESS INTERRUPTION) HOWEVER CAUSED AND ON ANY THEORY OF
   LIABILITY, WHETHER IN CONTRACT, STRICT LIABILITY, OR TORT (INCLUDING
   NEGLIGENCE OR OTHERWISE) ARISING IN ANY WAY OUT OF THE USE OF THIS
   SOFTWARE, EVEN IF ADVISED OF THE POSSIBILITY OF SUCH DAMAGE.


   Any feedback is very welcome.
   http://www.math.sci.hiroshima-u.ac.jp/~m-mat/MT/emt.html
   email: m-mat @ math.sci.hiroshima-u.ac.jp (remove space)

     -------------------

     Converted to Actionscript 2005 by John Winkelman
     Feedback welcome at john.winkelman@gmail.com
*/


/* Period parameters */
package org.eccesignum.utilities {
    public class MersenneTwister {
        private var N:Number = 624;
        private var M:Number = 397;
        private var MATRIX_A:Number = 0x9908b0df;   /* constant vector a */
        private var UPPER_MASK:Number = 0x80000000; /* most significant w-r bits */
        private var LOWER_MASK:Number = 0x7fffffff; /* least significant r bits */

        private var mt:Array; /* the array for the state vector  */
        private var mti:Number;

        private var seed:Number;
        private var returnLength:Number;
        private var maxSize:Number;

        private var returnArray:Array;


        public function MersenneTwister():void {

        }

        public function twist($seed:Number,$returnLength:int,$maxSize:int):Array {    //    seed number, number of values to return ,max size of returned number
            seed = $seed;
            returnLength = $returnLength;
            maxSize = $maxSize;
            mt = [];

            returnArray = [];

            mti = N+1; /* mti==N+1 means mt[N] is not initialized */
            var i:int;
            //var initArray=(0x123, 0x234, 0x345, 0x456);    //2010.04.20    modiied to the below
            var initArray:Array = [0x123, 0x234, 0x345, 0x456];
            init_by_array(initArray,initArray.length);
            for (i=0; i<returnLength; i++) {
                returnArray[i] = genrand_int32()%maxSize;
            }
            //returnArray.sort(16);
            //trace(returnArray);
            /*
            trace("\n1000 outputs of genrand_real2()\n");
            for (i=0; i<returnLength; i++) {
              trace(" " + genrand_real2());
              if (i%5==4) trace("\n");
            }
            */
            return returnArray;

        }


        /* initializes mt[N] with a seed */
        private function init_genrand($seed:Number):void {
            mt[0]= $seed & 0xffffffff;
            for (mti=1; mti<N; mti++) {
                mt[mti] = (1812433253 * (mt[mti-1] ^ (mt[mti-1] >> 30)) + mti);
                mt[mti] &= 0xffffffff;
                /* for >32 bit machines */
            }
        }

        /* initialize by an array with array-length */
        /* init_key is the array for initializing keys */
        /* key_length is its length */
        /* slight change for C++, 2004/2/26 */
        //    void init_by_array(unsigned long init_key[], int key_length)

        private function init_by_array($seedArray:Array,$seedArrayLength:Number):void {
            var i:Number = 1;
            var j:Number = 0;
            init_genrand(seed);
            //init_genrand(19650218);
            var k:Number = (N>$seedArrayLength) ? N : $seedArrayLength;
            for (k; k>0; k--) {
                mt[i] = (mt[i] ^ ((mt[i-1] ^ (mt[i-1] >> 30)) * 1664525)) + $seedArray[j] + j; /* non linear */
                mt[i] &= 0xffffffff; /* for WORDSIZE > 32 machines */
                i++;
                j++;
                if (i >= N) {
                    mt[0] = mt[N-1];
                    i=1;
                }
                if (j >= $seedArrayLength) j=0;
            }
            for (k = N-1; k; k--) {
                mt[i] = (mt[i] ^ ((mt[i-1] ^ (mt[i-1] >> 30)) * 1566083941)) - i; /* non linear */
                mt[i] &= 0xffffffff; /* for WORDSIZE > 32 machines */
                i++;
                if (i>=N) {
                    mt[0] = mt[N-1];
                    i=1;
                }
            }

            mt[0] = 0x80000000; /* MSB is 1; assuring non-zero initial array */
        }

        /* generates a random number on [0,0xffffffff]-interval */
        private function genrand_int32():Number    {
            var y:Number;
            var mag01:Array=[0x0, MATRIX_A];
            /* mag01[x] = x * MATRIX_A  for x=0,1 */

            if (mti >= N) { /* generate N words at one time */
                var kk:Number;

                if (mti == N+1)   /* if init_genrand() has not been called, */
                    init_genrand(5489); /* a default initial seed is used */

                for (kk=0;kk<N-M;kk++) {
                    y = (mt[kk]&UPPER_MASK)|(mt[kk+1]&LOWER_MASK);
                    mt[kk] = mt[kk+M] ^ (y >> 1) ^ mag01[y & 0x1];
                }
                for (;kk<N-1;kk++) {
                    y = (mt[kk]&UPPER_MASK)|(mt[kk+1]&LOWER_MASK);
                    mt[kk] = mt[kk+(M-N)] ^ (y >> 1) ^ mag01[y & 0x1];
                }
                y = (mt[N-1]&UPPER_MASK)|(mt[0]&LOWER_MASK);
                mt[N-1] = mt[M-1] ^ (y >> 1) ^ mag01[y & 0x1];

                mti = 0;
            }

            y = mt[mti++];

            /* Tempering */
            y ^= (y >> 11);
            y ^= (y << 7) & 0x9d2c5680;
            y ^= (y << 15) & 0xefc60000;
            y ^= (y >> 18);

            return y;
        }

        /* generates a random number on [0,0x7fffffff]-interval */
        private function genrand_int31():Number    {
            return (genrand_int32()>>1);
        }

        /* generates a random number on [0,1]-real-interval */
        private function genrand_real1():Number    {
            return genrand_int32()*(1.0/4294967295.0);
            /* divided by 2^32-1 */
        }

        /* generates a random number on [0,1)-real-interval */
        private function genrand_real2():Number {
            return genrand_int32()*(1.0/4294967296.0);
            /* divided by 2^32 */
        }

        /* generates a random number on (0,1)-real-interval */
        private function genrand_real3():Number    {
            return ((genrand_int32()) + 0.5)*(1.0/4294967296.0);
            /* divided by 2^32 */
        }

        /* generates a random number on [0,1) with 53-bit resolution*/
        private function genrand_res53():Number    {
            var a:Number = genrand_int32()>>5;
            var b:Number = genrand_int32()>>6;
            return(a*67108864.0+b)*(1.0/9007199254740992.0);
        }
        /* These real versions are due to Isaku Wada, 2002/01/09 added */
    }
}
And it is called like this:
var twister:MersenneTwister = new MersenneTwister();
twister.twist(17436,100,50000); // seed number, number of values to return, maximum size of a given value
Since I wrote this, many other people have made versions in Actionscript. There is a comprehensive list on the Mersenne Twister page at Wikipedia.
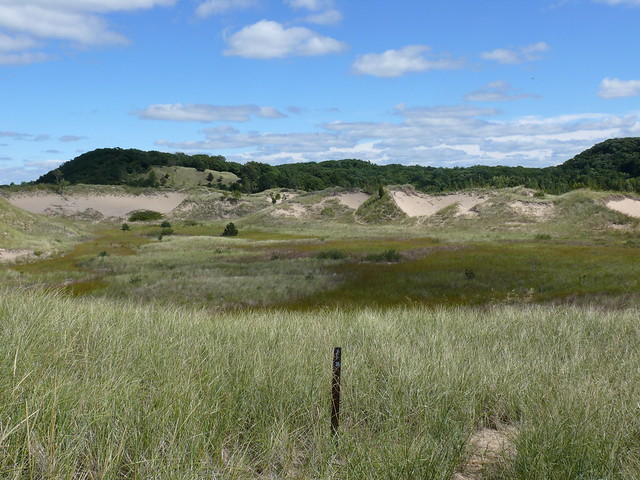
Over the Labor Day weekend Cynthia and I spent a day hiking in the Saugatuck Harbor Natural Area. If you haven’t been, or haven’t heard of it, I can’t recommend it highly enough! It starts at the north edge of Oval Beach in Saugatuck, and extends north along Lake Michigan to the Kalamazoo River channel. There are several marked trails in among the dunes. You can see it on a map here.
Click the photo to see the rest of the set on Flickr.
Here is another PhotoFly test. This is a stone bench outside of GRCC. PhotoFly found enough texture in the concrete that it was able to create the scene in one go, without me having to manually designate common points in any of the photos. You can see where PhotoFly still has problems with some areas, particularly where the texture in the foreground is too similar to the texture in the background. Notice the distortion on the bottom of the right underside of the bench. Also in the close-up of the underside there are a couple of small holes.
One improvement for PhotoFly would be the option to go back and fix errors which it has made when stitching photos. Alternately, re-render the scene, perhaps having the rendering engine run through the photos in a different order so it comes up with different “assumptions” about how the points in the photos fit together.
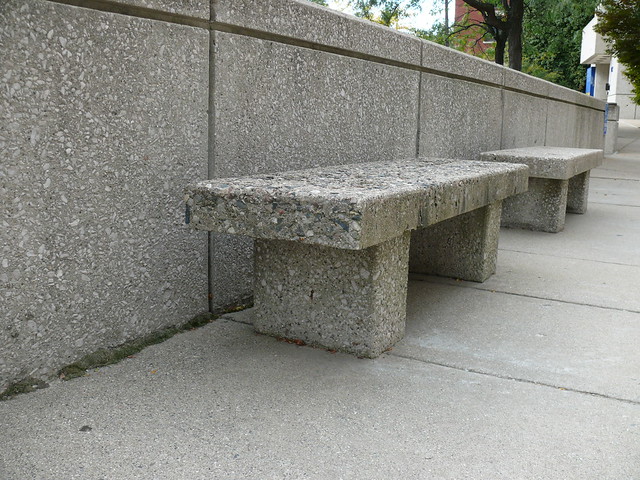
Also, here is one of the photos I used to create this render. Click it to see the rest. There are 23, and they are all of the bench. Not terribly exciting, but you will get an idea of how PhotoFly pulls information to create a 3d object.
Here are instructions for setting up the Flex SDK to allow Flash development targeting the new Flash 11 player, and how to set up the HTML in which it is embedded to allow for use of hardware acceleration, where appropriate.
Back in March Seth Godin wrote that he was happy that some of the common web technologies appear to be, in the opinion of the cognoscenti, “dead”. Dead, in this case, meaning supplanted by the myriad shiny new toys available to anyone with the appropriate budget and bandwidth. Now that the shine has worn off of “weblogs”, for instance, they can once again be made repositories of information. Useful, instead of cool.
I had never really thought about it, but he is absolutely right. Social media – Facebook, Twitter, and the like – have slurped up the attention bandwidth which once made Movable Type and the like profitable ventures. Your cat photos get posted on Facebook. Other peoples’ cat photos get posted on a Tumblr page. Add captions and upload it to I Can Has Cheezburger, and now everyone can play with your cat. (quick question: do you ever bother to pay attention to who creates individual LOLcats at ICHC?)
Kevin Kelly once said that the older a technology is, the more likely it is to remain useful*. Axes have been around at least as long as Homo sapiens, and levers probably even longer. And while the physical representation of an old-but-useful technology may evolve (c.f. axe -> saw -> chainsaw -> lightsaber), it seldom does away with the need which drove the original discovery. Actually, that may be the only event which would completely kill off a piece of technology – the ultimate solution to the problem which prompted its invention. When there is no longer anything which can be improved by the application of percussive force, the hammer will finally disappear.
* “old” technology is not synonymous with “dead” technology.
I just installed the Syntax Highlighter Javascript Library, which makes it easy to display easily-readable source code on websites. As my first test, here is a class I wrote in Actionscript 3 a couple of years ago, when I was deep in a dozen different projects, all built using Notepad++ and the MXMLC command-line compiler. The upshot of that was, no way to “trace” output from the .swf file. So I wrote my own, more or less. Here is the source code:
package {
	import flash.display.DisplayObjectContainer;
	import flash.display.Stage;
	import flash.display.Sprite;
	import flash.events.TimerEvent;
	import flash.events.MouseEvent;
	import flash.text.TextField;
	import flash.text.TextFormat;
	import flash.utils.Timer;
	public class InfoPanel extends Sprite {
		private var dragBar:Sprite;
		private var closeButton:Sprite;
		private var clearButton:Sprite;
		private var resizeButton:Sprite;
		private var outputWindow:TextField;
		private var timer:Timer;
		private var base:DisplayObjectContainer;
		private var isDragging:Boolean = false;
		private var isResizing:Boolean = false;
		private var dragMouseOffX:Number = 0;
		private var dragMouseOffY:Number = 0;
		private var resizeMouseOffX:Number = 0;
		private var resizeMouseOffY:Number = 0;
		private var w:Number = 0;
		private var h:Number = 0;
		private var bgc:Number;
		private var fgc:Number;
		private var outputFormat:TextFormat = new TextFormat("Courier New",11,0x33ff33,false,false,false,null,null,"left");
		public function InfoPanel($base:DisplayObjectContainer,$w:Number = 150,$h:Number = 100,$bgc:Number=0x000000,$fgc:Number=0x66ff66):void {
			base = $base;
			w = $w;
			h = $h;
			bgc = $bgc;
			fgc = $fgc;
			outputFormat.color = fgc;
			graphics.lineStyle(0,0x666666,1);
			graphics.beginFill(bgc,1);
			graphics.drawRect(0,0,w,h);
			graphics.endFill();
			dragBar = new Sprite();
			dragBar.graphics.beginFill(0x666666,1);
			dragBar.graphics.drawRect(0,0,w,10);
			dragBar.graphics.endFill();
			dragBar.buttonMode = true;
			dragBar.useHandCursor = true;
			dragBar.addEventListener(MouseEvent.MOUSE_DOWN,onDragMouseDown);
			dragBar.addEventListener(MouseEvent.MOUSE_UP,onDragMouseUp);
			dragBar.x = 0;
			dragBar.y = 0;
			addChild(dragBar);


			clearButton = new Sprite();
			clearButton.graphics.lineStyle(0,0xcccccc,1)
			clearButton.graphics.beginFill(0x666666,1);
			clearButton.graphics.drawCircle(0,0,3);
			clearButton.graphics.endFill();
			clearButton.x = w-15;
			clearButton.y = 5;
			clearButton.buttonMode = true;
			clearButton.useHandCursor = true;
			clearButton.addEventListener(MouseEvent.CLICK,onClearButtonClicked);
			addChild(clearButton);


			closeButton = new Sprite();
			closeButton.graphics.beginFill(0xcccccc,1);
			closeButton.graphics.drawCircle(0,0,3);
			closeButton.graphics.endFill();
			closeButton.x = w-5;
			closeButton.y = 5;
			closeButton.buttonMode = true;
			closeButton.useHandCursor = true;
			closeButton.addEventListener(MouseEvent.CLICK,onCloseButtonClicked);
			addChild(closeButton);
			resizeButton = new Sprite();
			resizeButton.graphics.beginFill(0xcccccc,1);
			resizeButton.graphics.drawRect(0,0,6,6);
			resizeButton.graphics.endFill();
			resizeButton.x = w-6;
			resizeButton.y = h-6;
			resizeButton.buttonMode = true;
			resizeButton.useHandCursor = true;
			resizeButton.addEventListener(MouseEvent.MOUSE_DOWN,onResizeMouseDown);
			resizeButton.addEventListener(MouseEvent.MOUSE_UP,onResizeMouseUp);
			addChild(resizeButton);

			outputWindow = new TextField();
			outputWindow.width = w-10;
			outputWindow.height = h-20;
			outputWindow.x = 5;
			outputWindow.y = 15;
			outputWindow.selectable = true;
			outputWindow.wordWrap = true;
			outputWindow.multiline = true;
			outputWindow.text = "STATS";
			outputWindow.setTextFormat(outputFormat);
			outputWindow.defaultTextFormat = outputFormat;

			addChild(outputWindow);
			timer = new Timer(25);
			timer.addEventListener(TimerEvent.TIMER,onTimer);
		}

		private function onTimer(e:TimerEvent):void {
			if(isDragging==true) dragMe();
			if(isResizing==true) resizeMe();
			e.updateAfterEvent();
		}
		private function onDragMouseDown(e:MouseEvent):void {
			e.stopPropagation();
			dragMouseOffX = e.target.mouseX;
			dragMouseOffY = e.target.mouseY;
			startMe();
			isDragging = true;
		}
		private function onDragMouseUp(e:MouseEvent):void {
			isDragging = false;
			stopMe();
			base.addChild(this);
		}
		private function onResizeMouseDown(e:MouseEvent):void {
			e.stopPropagation();
			resizeMouseOffX = e.target.mouseX;
			resizeMouseOffY = e.target.mouseY;
			startMe();
			isResizing = true;
		}
		private function onResizeMouseUp(e:MouseEvent):void {
			isResizing = false;
			stopMe();
		}
		private function onCloseButtonClicked(e:MouseEvent):void {
			e.stopPropagation();
			hideMe();
		}
		private function onClearButtonClicked(e:MouseEvent):void {
			outputWindow.text = "";
		}
		private function startMe():void {
			timer.start();
		}
		private function stopMe():void {
			timer.stop();
		}
		public function showMe():void {
			base.addChild(this);
		}
		public function hideMe():void {
			base.removeChild(this);
		}
		private function dragMe():void {
			x = stage.mouseX - dragMouseOffX;
			y = stage.mouseY - dragMouseOffY;
		}
		private function resizeMe():void {
			w = mouseX + 6 - resizeMouseOffX;
			h = mouseY + 6 - resizeMouseOffY;
			graphics.clear();
			graphics.lineStyle(0,0x666666,1);
			graphics.beginFill(bgc,1);
			graphics.drawRect(0,0,w,h);
			graphics.endFill();
			dragBar.graphics.clear();
			dragBar.graphics.beginFill(0x666666,1);
			dragBar.graphics.drawRect(0,0,w,10);
			dragBar.graphics.endFill();
			outputWindow.width = w - 10;
			outputWindow.height = h - 20;
			resizeButton.x = w - 6;
			resizeButton.y = h - 6
			clearButton.x = w - 15;
			closeButton.x = w - 5;
		}
		public function update($s:*,$r:Boolean = false):void {
			if($r==true) {
				outputWindow.text = $s.toString();
			} else {
				outputWindow.appendText("\n"+$s.toString());
			}
			outputWindow.scrollV = outputWindow.maxScrollV;
			base.addChild(this);
		}
	}
}
And it is called like this:
var info:InfoPanel = new InfoPanel(this);
info.update("hello world");
After being created the InfoPanel can be positioned just like any other DisplayObject. It accepts up to five arguments, in this order:
parent:DisplayObjectContainer, width:Number, height:Number, backgroundColor:Number,textColor:Number
Of them, only the parent argument is required; the rest will revert to default values if left empty. The parent item must be a DisplayObjectContainer, such as the Stage, or a MovieClip or Sprite.
Once created, the InfoPanel can be moved, resized, cleared and closed with the mouse.
To update the content, use the following method call:
info.update("a string");
This will append a line break, then the string. To clear the info panel when updating it, use the method call as follows:
info.update("a string",true);
Be careful; once the content of the InfoPanel starts measuring in the many thousands of characters, updating it may start to bog down the Flash player, slowing down whatever else you are running.
Off and on over the past several weeks I have wandered around town with my camera looking for likely subjects to turn into 3d digital representations of themselves. My success rate is about .5, and is mostly made up of tree trunks and patches of gravel. Small objects, and objects in a light box, have not worked at all. I don’t know if this is a fundamental flaw with PhotoFly, an artifact of PhotoFly being in beta, or if I just don’t get it. I suspect (and hope) it is a mix of the latter two.
But enough of that. Of my successes, I have created animations of the best ones and posted them on YouTube.
This is the first animation I created. PhotoFly makes this quite easy, with a well-thought-out timeline-based animation tool. The gaps in the scene are places where the camera could not see the environment from where I took the photos. While beautiful, there are not a lot of vantage points at the koi pond.
This tree trunk is the second successful scene. The photos are from my parent’s house in Springport. I believe I took around 20 photos. Notice the gaps in the grass around the highest-resolution parts of the lawn. This is where PhotoFly couldn’t quite figure out how to stitch parts of the scene together, because grass is too uniform a color and texture for the software to sort out.
This one is my favorite so far. the overpass is a block from my house. I was wandering around with my camera when I noticed an extraordinary piece of graffiti on the concrete embankment. I took a few photos, then began wandering up and down the tracks, and up into the nooks and crannies of the overpass, trying to get everything from every angle. Mostly, I succeeded. The bridge is quite new, and nowhere near as post-apocalyptic in real life as it appears in the animation. This is my only successful attempts at modelling a hollow structure.
I went back a couple of weeks later, intending to model the entire overpass, including the railroad track leading into it. Unfortunately, the regularity, the sameness of the man-made parts of the scene confounded PhotoFly, and of the hundred or so photos I took, PhotoFly only managed to incorporate about 20 into the final scene, which looked like someone had printed a photo of the bridge onto a wad of silly putty, then twisted it up and thrown it against a wall. I suspect that a more judicious use of angles when taking photos would make a future attempt more successful.
In my opinion, this is the most successful of all of my PhotoFly experiments, simply because this is the one with the least amount of distortion. The photos which went into this scene are from the Lake Michigan shoreline, just north of Oval Beach in Saugatuck, Michigan. There was enough light, and enough varied texture, that the software created this scene in one go. I didn’t need to define any points or re-stitch any of the photos. It just worked.
This is the most recent one. A goose-neck gourd, on a foot stool in my back yard. I would call it a qualified success. The yard looks great! The gourd, other than the neck, looks pretty good. The footstool – the man-made, smooth, texture-less object – is warped and distorted, and has been melded with the background. This one probably suffered a little from the bright sunlight. The gourd is smooth and shiny, and some of its color patterns were obscured by reflections.
The three things PhotoFly seems to have the most difficulty with are reflections, lack of context, and sharply contrasting light sources. The pattern recognition part of PhotoFly can’t (at present) distinguish between a pattern and a reflection of a pattern. This makes sense; it tries to find and reproduce patterns. If two parts of a photo have the same pattern, it is difficult to decide which part goes where, without a lot of other contextual information.
Which is why PhotoFly doesn’t work well with, for instance, something in a light box. The thing itself may have astonishing detail, but without detailed surroundings to give it a location in space, PhotoFly can’t (again, at present) determine angles, curves, relative distances, and the like. This is one case where having a light source which is the same strength, everywhere at once, is actually a detriment.
With brightly contrasting light, say, a plain-colored object in full afternoon sunlight, PhotoFly doesn’t necessarily recognize that the shady side of an object is attached to the sunny side of the object. If the object has a rich texture, lots of additional information which the software can use to create context, this is not such a problem, but a photo of e.g. a large rock, partially silhouetted against the sky, doesn’t work so well.
Having figured these issues out, it is simple to come up with successful PhotoFly scenes. If I discover a workaround to any of the above issues, I will post it here and at the AutoDesk Labs forums.
For the most part, putting this site together went smoothly. Sure copy-and-pasting 700+ blog entries was a bit of a chore, as was going through every post to find which ones had digital assets which needed to be re-hosted. Tiresome, but not difficult.
In every previous version of this site, if I had a Flash movie which I wanted to show off, I would either post it in-line in the blog, or put it on its own page and link to it, or only show a teaser image on the front page and embed the animation in the full post. For this site I wanted something new. You’ve all seen light boxes – you click on a thumbnail photo, and a translucent overlay appears over the site, and the relevant content appears therein. I decided to go with one of those.
There are myriad ways to create a lightbox. All involve Javascript and CSS, and most of them are good at what they do. I decided to go with ShadowBox.js because it supports all kind of content; not just Flash and/or images. I ran it through a few static page tests, and it had everything I needed.
Getting it hooked up in Drupal Gardens (“DG”) was a little more challenging. Since DG users don’t have access to modify the actual templates of the site, using external code files can be a little challenging. The DG help files recommend creating a block in the header and copy-and-pasting the javascript into a plain text file, and embedding it directly in the HTML for a page. This is what I have done in the past, but having just uploaded over a hundred Flash movies and photos to the content area of the site, I decided to try something new.
It turns out that you can upload any kind of content you want to the content/media area of DG. You might need to make changes in the configuration area of your site to allow for the upload of e.g. a .js or .swf file, but it can be easily done. There is one thing to note: Nothing loaded into this area is processed on the server. If you upload a .php file, it will be served as plain text, NOT processed through Drupal/PHP. Fortunately, for Javascript, I don’t need it to be processed. Plain text is just fine.
Accessing the Javascript is easy; everything uploaded to the media library on DG is in the /sites/mysite.drupalgardens.com/files/ directory. To access it, I created a block which contains a <script> tag, which links to the new files at /sites/mysite.drupalgardens.com/files/shadowbox.js. Everything worked on the first try.
More technical notes to follow, as I figure out how to do more things in Drupal.